

Custom Decals for Retail Windows: 2026 Buyer's Guide
Table of Contents
- Why Custom Decals for Retail Windows Earn Their Space
- Quick Comparison: Retail Window Decals and Graphics
- Clear Window Decals: Sizes and Pricing
- Perforated Vinyl Window Graphics and Other Material Choices
- Window Decal Installation Tips for a Bubble-Free Finish
- How to Update Retail Window Displays Frequently Without Wasting Budget
- Maintenance, Removal, and Compliance Basics
- Conclusion
- Frequently Asked Questions
Last Updated: October 2, 2026
Why Custom Decals for Retail Windows Earn Their Space
Custom decals for retail windows are printed adhesive graphics applied to storefront glass to promote a brand, announce a promotion, or shape how a shop looks from the street. Unlike a hanging sign, a decal works on the glass itself, catching foot traffic at eye level before anyone reaches the door. Stores that treat their windows as a marketing surface get more walk-in attention than stores that leave the glass bare.
Quick Comparison: Retail Window Decals and Graphics
The right window graphic depends on one question: do you need to see through the glass? Clear decals and vinyl lettering keep the view; perforated film and opaque coverings trade visibility for privacy or a full-bleed image.
| Product | Starting Price | See-Through | Best For |
|---|---|---|---|
| Clear Window Decals | $16 / $24 / $32 | Yes | Branding without blocking daylight |
| Vinyl Lettering | $40 | Yes | Names, hours, promotions |
| Window Graphic (Indoor) | $45 | Partial | Full-color interior-facing graphics |
| Window Poster with Suction Cups | $24 | No | Seasonal promos, easy swaps |
| Storefront Re-Surface Vinyl | $8 per sqft | No | Refreshing existing signage |
| Black Kraft Paper Covering | $1 per sqft | No | Renovations, privacy |
Clear Window Decals: Sizes and Pricing
Clear window decals are transparent graphics printed on 3 mil vinyl with UV ink, with optional white ink for vivid color. They promote a brand or message on any storefront, window, or glass door without blocking the view, the default for shops that want daylight and branding at once.

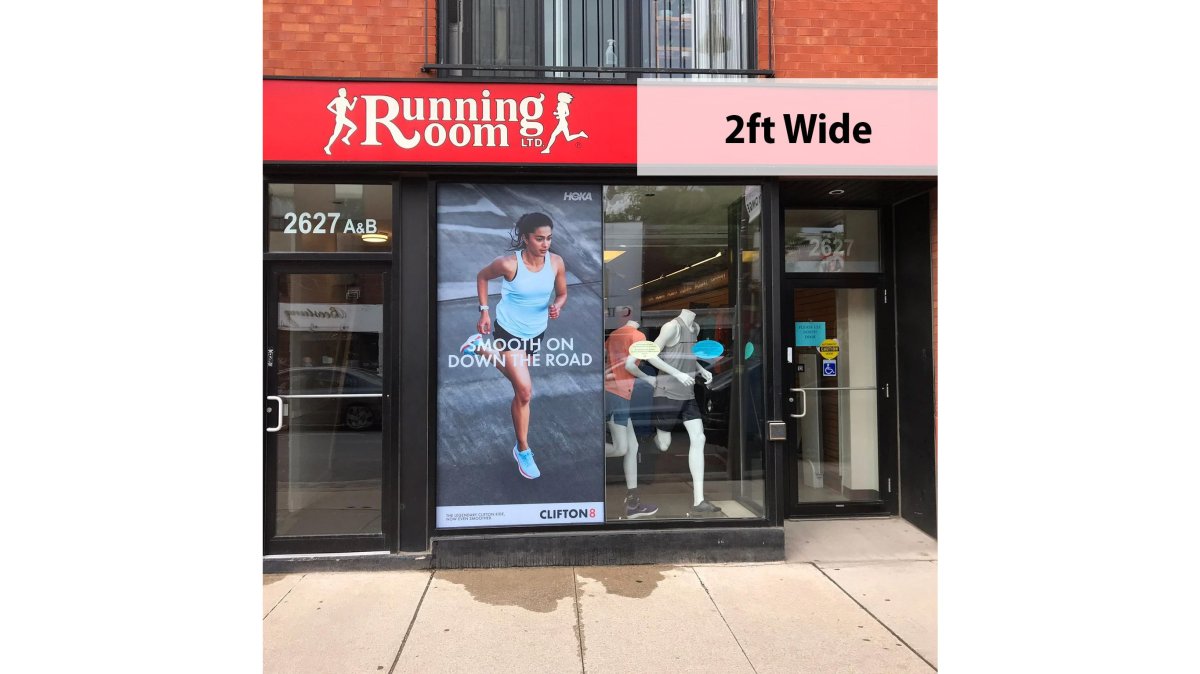
- 2 ft wide: $16.00 for smaller door panels and single-pane windows
- 3 ft wide: $24.00 for standard storefront panes
- 4 ft wide: $32.00 for large glass and wide entrance sections
Width Options for Clear Window Decals
Width is the first decision, and it should follow the pane, not the artwork. Measure the flat glass area you want to cover, then pick the closest standard width rather than a custom size that adds lead time. A 2 ft decal fits most single entry doors, a 3 ft sheet covers a standard retail pane, and the 4 ft option suits wide-format storefronts and mall-facing glass.
Perforated Vinyl Window Graphics and Other Material Choices
The material decision comes down to three questions: Do you need to see through the glass? How long will the graphic stay up? Does the window face direct sun?
Here is how the main materials compare:
| Material | See-Through | Typical Lifespan | Relative Cost | Best Use |
|---|---|---|---|---|
| Clear adhesive vinyl (3 mil) | Yes | 1-3 years | Lowest | Branding, hours, logos |
| Perforated vinyl | One-way | 2-4 years | Mid | Privacy with outward visibility |
| Opaque vinyl | No | 3-5 years | Mid | Full-color storefront branding |
| Laminated vinyl | Depends on base | 3-5+ years | Mid-high | Sun-facing windows |
| Styrene poster | No | Reusable | Low per swap | Seasonal promotions |
| Kraft paper | No | Weeks to months | Lowest per sqft | Renovation, closure |
Window Decal Installation Tips for a Bubble-Free Finish
Window decal installation tips matter more than most buyers expect, because a poorly applied decal looks worse than no decal at all. Bubbles come from avoidable causes, all fixed before the vinyl touches the glass.
- Clean the glass properly. Wipe with a glass cleaner, then follow with isopropyl alcohol. Any dust, grease, or adhesive residue from old tape will trap air.
- Work in the right conditions. Apply when the glass is between roughly 10°C and 30°C. Cold glass makes vinyl stiff and prone to cracking; hot glass makes it stretch.
- Use the wet method for large decals. A few drops of dish soap in a spray bottle of water lets you slide the decal into position and push air out before it grabs.
- Apply with a squeegee, not your hand. Start at the center and push outward in firm strokes, overlapping each pass.
- Peel the transfer tape slowly at a low angle. Ripping it off fast is what lifts edges and pulls small letters out of place.
Tools and Surface Prep
You need five things: a squeegee, a spray bottle, isopropyl alcohol, a lint-free cloth, and a sharp knife for trimming. Surface prep is the part people skip, and it decides whether the decal lasts.
How to Update Retail Window Displays Frequently Without Wasting Budget
Updating retail window displays frequently is a budget question, not a design question. Stores that refresh every few weeks are not spending more; they choose formats that swap cheaply and reuse the expensive parts.
A few habits keep this cheap:
Clear Window Decals - 2ft Wide →
- Order posters in batches so a new promotion is always ready to hang
- Keep one reusable size for posters, so frames and suction cups are not replaced each time
- Use vinyl lettering for anything that changes on a schedule, like hours or a rotating offer
- Store removed decals flat between two sheets of backing paper if you plan to reuse them
Maintenance, Removal, and Compliance Basics
Maintenance is minimal if the decal was applied to clean glass. Wipe the surface with a damp cloth and mild soap when it looks dull, and avoid abrasive pads and ammonia-heavy cleaners on laminated vinyl, since both dull the finish. Inspect the edges once a season; a lifted corner is the start of a peel, and pressing it back down takes seconds while reordering takes days.
How to Remove a Window Decal Without Damaging the Glass
Removal is where clear vinyl earns its reputation, but the method matters:
- Warm the vinyl. Aim a hair dryer at the decal on low, moving continuously, until the adhesive softens and the vinyl feels pliable. Do not hold the heat in one spot, since concentrated heat can crack glass that is cold or has a chip.
- Start at a corner. Lift the edge with a plastic razor blade or your fingernail. Never use a metal scraper on glass.
- Pull at a low angle. Keep the vinyl close to the glass and pull back on itself, not straight out. A low-angle pull keeps the adhesive with the vinyl instead of leaving it behind.
- Work in sections. For large decals, warm and peel one section at a time rather than trying to remove the whole sheet at once.
- Remove residue with isopropyl alcohol. Any leftover adhesive comes off with isopropyl alcohol on a lint-free cloth. For stubborn patches, a citrus-based adhesive remover works, but test it on an inconspicuous corner first.
Compliance: The Part Most Guides Skip
Compliance is the piece most guides skip, and it is the one that can cost you. Storefront signage and window graphics fall under municipal sign bylaws that vary by city, so check with your local bylaw office before ordering a full-window wrap. Three categories of rule come up most often:
- Coverage limits. Some municipalities cap how much of a window can be covered by signage. A common threshold is a percentage of the glass area, and a full opaque covering often exceeds it.
- Permits. Permanent installations frequently require a sign permit, while temporary or seasonal graphics may not. The distinction is usually based on how long the graphic stays up and whether it is illuminated.
- Illumination. Backlit or illuminated window signage is regulated separately from non-illuminated graphics and often carries its own permit and electrical requirements.
Conclusion
The hard part of retail window marketing is not design. It is picking a format that survives the weather, fits the glass, and swaps easily when the promotion changes. Get those three right and the window keeps earning attention long after the campaign ends.
Frequently Asked Questions
What are the best materials for long-lasting retail window decals?
Transparent 3 mil vinyl printed with UV ink holds up well on storefront glass because it resists fading and peeling. If you want a crisp, professional look for lettering, adhesive vinyl lettering in black, white, or stock colours is durable and weather-resistant. Lamination in gloss or matte adds another layer of protection against scratches and UV exposure, which matters most on south-facing windows that take direct sun.
How much do custom decals for retail windows typically cost?
Pricing depends on size and material. Clear window decals start at $16.00 for a 2 ft wide format, $24.00 for 3 ft wide, and $32.00 for 4 ft wide. Vinyl lettering starts at $40.00 for sizes up to 20 ft high. Indoor window graphics start at $45.00, with custom sizes at $8.50 per square foot. Storefront re-surface vinyl is priced per square foot from $8.00, and black kraft paper window covering is $1.00 per square foot, useful for renovations or seasonal closures.
How do you apply window decal installation tips without bubbles?
Clean the glass first with a lint-free cloth and a mild solution, then let it dry fully. Peel back only the top few centimetres of the backing and align the decal edge with your reference mark. Press down with a squeegee from the centre outward, working in overlapping strokes. If a bubble appears, lift the nearest corner and re-squeegee. For larger panels, a second set of hands makes alignment easier. Apply in shade or on a cool day, since direct sun makes vinyl stretch and trap air.
Are custom window decals removable and reusable?
Adhesive-backed vinyl decals are designed to remove cleanly from glass without damaging the surface underneath, which makes them practical for seasonal promotions. Reusability depends on the material. Suction cup window posters using 020 or 040 styrene can be repositioned repeatedly because there is no adhesive involved. Adhesive decals usually are not reusable once peeled, since the adhesive layer picks up dust and loses tack. If you plan to rotate graphics often, keep a set of suction cup posters alongside your adhesive decals.
What is the difference between perforated and solid vinyl window decals?
Solid vinyl, including clear and opaque graphics, blocks whatever is behind it. Solid clear vinyl with optional white ink works better for logos, hours, and promotional messages where transparency around the artwork matters more than full coverage.